This is NOT authored by me. It's by someone I know and it is too well written to let it disappear into a swarm of Facebook comments. Posted with permission from the author, Diamondflamer.
--------------
I wanna elaborate more because of quite a few people lamenting their lack of success here or in poly in general...
Yes there are fewer of us, often more spread out, but that means we just have to be adaptable and willing to adjust our strategies, not put all our hopes in just one place or one set idea of what we want and use multiple resources.
Also not expecting the moon on a stick as soon as we decide we want to date in a poly way. Unlike the average dating site/app, here you've entered a relatively small but diverse and established, cautious community all doing poly in their own way, as a new and unknown person. A community that contains a lot of folk who are wary of new to poly folk/the community due to witnessing or being on the receiving end of those who have abused poly spaces in the past and behaved in a shitty way, often more times than they can count over the years.
Publicly whining about not getting a date in such spaces without having first done the things that you're advised may help you be more successful with how you put yourself across or showing you have learned from mistakes you may have made etc. just makes you come across entitled and/or desperate and also lazy and possibly even too much of a risk for even the brave or naive amongst us to take a chance on, esp if there's distance involved as well.
But even if you do follow all the guidance, aren't a dick, show off your own brand of awesomeness, write a great ad, have cute pics, go to meet ups and make friends and become an active part of the poly community, guess what? You're still not guaranteed or entitled to get dates or interest from people you are also interested in yourself or are the same kinda poly, because it's not a transactional process. The same as if you're mono. You can only increase your chances, the rest is down to chemistry and other factors outside of our control.
You have to be OK with it potentially not working out, but those of us who stick at it and *do* successfully meet and connect with people will tell you over and over again, that even if there's some heartbreak involved and false starts and nearly giving up, we are so glad we did stick it out, we did keep trying and it is really worth it. So many folk who may appear to be living their poly dream now likely have similar times in their past where they wanted to give up or threw a wobbly about being lonely etc. We dusted ourselves off, learned, opened ourselves up again and at some point you look back and you're like wow.. this isn't where I expected I would be on my poly journey when I set out but I am also really glad of where I am or some of the places I've been and who the hell knows where things will lead next?
Sorry for the rant, but hope it's taken in the supportive "you can do the thing, keep trying" vibe it's meant vs an attack.
------------

Wednesday, 30 October 2019

Monday, 26 May 2014
Random stuff we need for the VW T4 Transporter
I'm not expecting anyone to be interested in this, it's just a handy place to store the wish list....
Cover for sliding door rail and ceiling panel, saves faffing about with carpeting all the way along the top edge
£37.99
http://www.t4srus.co.uk/vw-t4-trimtech-sliding-door-top-trim-1096i-508-p.asp
Bench double seat swivel base
£219.99
http://www.ebay.co.uk/itm/VW-T4-Transporter-Camper-Van-Double-Seat-Swivel-Base-/121353093975?pt=UK_Campervan_Caravan_Accessories&hash=item1c41354357
Short-shift mod
http://www.vwt4forum.co.uk/showthread.php?t=48108&page=13
Towbar wiring and cluster diagram
http://www.vwt4forum.co.uk/showthread.php?t=36950&highlight=rear+cluster+wiring
Cover for sliding door rail and ceiling panel, saves faffing about with carpeting all the way along the top edge
£37.99
http://www.t4srus.co.uk/vw-t4-trimtech-sliding-door-top-trim-1096i-508-p.asp
Bench double seat swivel base
£219.99
http://www.ebay.co.uk/itm/VW-T4-Transporter-Camper-Van-Double-Seat-Swivel-Base-/121353093975?pt=UK_Campervan_Caravan_Accessories&hash=item1c41354357
Short-shift mod
http://www.vwt4forum.co.uk/showthread.php?t=48108&page=13
Towbar wiring and cluster diagram
http://www.vwt4forum.co.uk/showthread.php?t=36950&highlight=rear+cluster+wiring
Monday, 5 August 2013
VBA Modules: I've started a new blog
EDIT: left the background info up but have moved all my code posts into a new separate code blog
http://baldywrittencod.blogspot.com
Original post and info follows:
As a bit of personal background, I've been developing in VBA automation since 2009, with about 3 years of moderate Excel & Access VBA development behind that, so the majority of the code is designed with Excel automation in mind, but does make use of Access and Outlook VBA where needed. I've never had to automate Powerpoint or other MS apps but I'm sure I will eventually.
I work for a globocorp, and all the network addresses you will see here are completely inaccessible to anyone outside the company, so just change them for your own file locations.
Please note that I make no claims to copyright as all my code is open source, largely stolen, copied, or adapted from other snippets of code I've found via Google, usually with the original source link included for reference and polite attribution. I've never had any formal VBA training, so this is all picked up from the interweb, and adapted for my own needs, using my own fair hands. Feel free to steal, copy or adapt my code for your own needs -- that's what I did!
The modules I'll post here are interlinked (so you'd need to "install" the whole series to get full functionality and stop errors with Debug > Compile) but they do largely work as standalone modules. I've annotated which modules are dependent on which, so it's easy to see that for yourself.
I've been loathe to post these modules online because they're never, ever "finished", as I keep adding new features as and when I need them. But, in a stroke of momentary genius a while ago, I started version-numbering the macros to keep track of the various changes, and I've recently started keeping a Version History in all modules, so I reckon I can now keep my blog up-to-date with changes. (We'll soon see!) Plus, after migrating everything to a new server with Office 2010, I think I'm finally running out of necessary improvements to make. It does just about everything I need it to.
However, I must be clear about this: this code is not for the faint-hearted. I don't always put syntax or other descriptive details in the macros, so you'll need a fair bit of VBA knowledge under your belt to make sense of some of it. But it should at least work... feel free to just try it out, and ask me questions if you're not sure about how anything works or what it does -- I'll improve the code annotations as I go along -- but if you're a VBA n00b, there are countless Excel / VBA forums with hundreds of members where you can get basic support, just as I did. VBA has a pretty steep learning curve if you don't have the time to develop your skills gradually. I had 5 years to develop mine. Another guy I saw asking a complete n00b question on a forum ended up with his profile being marked as "Excel VBA MVP" within 3 years. So before you jump from the high dive board, I'd strongly suggest you either pay for a professional VBA course, hire a spod to do it, or just think again and start in the shallow end.
First module here:
http://baldywrittencod.blogspot.com/2013/08/vba-modules-modzip-v502aaa.html
http://baldywrittencod.blogspot.com
Original post and info follows:
As a bit of personal background, I've been developing in VBA automation since 2009, with about 3 years of moderate Excel & Access VBA development behind that, so the majority of the code is designed with Excel automation in mind, but does make use of Access and Outlook VBA where needed. I've never had to automate Powerpoint or other MS apps but I'm sure I will eventually.
I work for a globocorp, and all the network addresses you will see here are completely inaccessible to anyone outside the company, so just change them for your own file locations.
Please note that I make no claims to copyright as all my code is open source, largely stolen, copied, or adapted from other snippets of code I've found via Google, usually with the original source link included for reference and polite attribution. I've never had any formal VBA training, so this is all picked up from the interweb, and adapted for my own needs, using my own fair hands. Feel free to steal, copy or adapt my code for your own needs -- that's what I did!
The modules I'll post here are interlinked (so you'd need to "install" the whole series to get full functionality and stop errors with Debug > Compile) but they do largely work as standalone modules. I've annotated which modules are dependent on which, so it's easy to see that for yourself.
I've been loathe to post these modules online because they're never, ever "finished", as I keep adding new features as and when I need them. But, in a stroke of momentary genius a while ago, I started version-numbering the macros to keep track of the various changes, and I've recently started keeping a Version History in all modules, so I reckon I can now keep my blog up-to-date with changes. (We'll soon see!) Plus, after migrating everything to a new server with Office 2010, I think I'm finally running out of necessary improvements to make. It does just about everything I need it to.
However, I must be clear about this: this code is not for the faint-hearted. I don't always put syntax or other descriptive details in the macros, so you'll need a fair bit of VBA knowledge under your belt to make sense of some of it. But it should at least work... feel free to just try it out, and ask me questions if you're not sure about how anything works or what it does -- I'll improve the code annotations as I go along -- but if you're a VBA n00b, there are countless Excel / VBA forums with hundreds of members where you can get basic support, just as I did. VBA has a pretty steep learning curve if you don't have the time to develop your skills gradually. I had 5 years to develop mine. Another guy I saw asking a complete n00b question on a forum ended up with his profile being marked as "Excel VBA MVP" within 3 years. So before you jump from the high dive board, I'd strongly suggest you either pay for a professional VBA course, hire a spod to do it, or just think again and start in the shallow end.
First module here:
http://baldywrittencod.blogspot.com/2013/08/vba-modules-modzip-v502aaa.html
Friday, 4 January 2013
VBA Macro to remove special characters from path and/or filename and/or VBA object name
Solution originally posted here:
http://stackoverflow.com/a/14157011/1540567
This VBA function removes special characters from a string. In my case I wanted a single function to return a valid path and/or filename and/or VBAProject name. It works with both URL and UNC paths (and tries to clean up any paths with mixed slashes).
It's easy enough to tweak this for other purposes. You can specify additional "forbidden" characters easily and add any extra boolean switches for your own specific needs, or you could just split into separate functions.
The function also checks the maximum string length and either crops or pops up a message box if a filename (not path) exceeds 128 characters -- very useful for SharePoint uploads -- or a VBA object name exceeds 35 characters.
Debug Window results:
http://stackoverflow.com/a/14157011/1540567
This VBA function removes special characters from a string. In my case I wanted a single function to return a valid path and/or filename and/or VBAProject name. It works with both URL and UNC paths (and tries to clean up any paths with mixed slashes).
It's easy enough to tweak this for other purposes. You can specify additional "forbidden" characters easily and add any extra boolean switches for your own specific needs, or you could just split into separate functions.
The function also checks the maximum string length and either crops or pops up a message box if a filename (not path) exceeds 128 characters -- very useful for SharePoint uploads -- or a VBA object name exceeds 35 characters.
Function fn_Clean_Special(str As String, CropLength As Boolean _
, Optional VBObjectName As Boolean) As String
'v1.03 2013-01-04 15:54
'removes invalid special characters from path/file string
', True stops message box warnings and autocrops string
' [, True] also removes spaces and hyphens and periods (VBA object)
'~ " # % & * : < > ? { | } .. / \ -
Dim b As Integer, c As Integer, pp As String
Const tt As String = "fn_Clean_Special"
Dim sc(0 To 18) As String
sc(0) = "~"
sc(1) = Chr(34) ' Chr(34) = " quotemark
sc(2) = "#"
sc(3) = "%"
sc(4) = "&"
sc(5) = "*"
sc(6) = ":"
sc(7) = "<"
sc(8) = ">"
sc(9) = "?"
sc(10) = "{"
sc(11) = "|"
sc(12) = "}"
sc(13) = ".."
'slashes for filenames and VB Object names
sc(14) = "/"
sc(15) = "\"
'hyphen & space & period for VB Object names
sc(16) = "-"
sc(17) = " "
sc(18) = "."
'remove special characters from all
For b = 0 To 13
str = Replace(str, sc(b), vbNullString)
Next b
'check filename length (length AFTER the LAST slash max 128 chars)
b = InStr(1, str, sc(14)) 'look for fwd slash
If b > 0 Then
str = Replace(str, sc(15), sc(14)) 'remove all back slashes
Do Until b = 0 'until last slash found
c = b 'c is position of last slash
b = b + 1 'next position
b = InStr(b, str, sc(14)) 'next position
Loop
Else 'no fwd slashes
b = InStr(1, str, sc(15)) 'look for back slash
If b > 0 Then
str = Replace(str, sc(14), sc(15)) 'remove all fwd slashes
Do Until b = 0 'until last slash found
c = b 'c is position of last slash
b = b + 1 'next position
b = InStr(b, str, sc(15)) 'next position
Loop
End If
End If
'c is position of last slash, or 0 if no slashes
If Len(str) - c > 128 Then
If CropLength = True Then
str = Left(str, 35)
Else
pp = "WARNING: filename > 128 chars"
MsgBox pp, vbCritical, tt
End If
End If
'remove slashes from filenames only
If c > 0 Then
For b = 14 To 15
str = Left(str, c) & Replace(Right(str, Len(str) - c), sc(b), vbNullString)
Next b
End If
If VBObjectName = True Then
'remove slashes and swap hyphens & spaces & periods for underscore in VB object name
Const scUS As String = "_"
For b = 14 To 18
str = Replace(str, sc(b), scUS)
Next b
'then remove invalid characters from start of string
Dim c1 As String
c1 = Left(str, 1)
Do While c1 = scUS Or c1 = sc(18) Or IsNumeric(c1)
str = Right(str, Len(str) - 1)
c1 = Left(str, 1)
Loop
'remove double underscore
Do While InStr(str, scUS & scUS) > 0
str = Replace(str, scUS & scUS, scUS)
Loop
'check object name length (max 35 chars)
If Len(str) > 35 Then
If CropLength = True Then
str = Left(str, 35)
Else
pp = "WARNING: object name > 35 chars"
MsgBox pp, vbCritical, tt
End If
End If
End If
fn_Clean_Special = str
End Function
Debug Window results:
?fn_clean_special("\\server\path\filename.xls", True)
\\server\path\filename.xls
?fn_clean_special("\\server\path\filename.xls", True, True)
server_path_filename_xls
?fn_Clean_Special("\\special character\testing for \VBproject.xls", True, True)
special_character_testing_for_VBpro
Friday, 19 October 2012
Grom Audio USB2 - Excel macro to Rename and Sort Tracks
Excel .xlsm file with a VBA macro that will sweep through a list of folders and rename all the tracks to a standard format. It renames "Trackname 001.mp3" to "001-Trackname.mp3" and "Album - 01 - Trackname.mp3" to "01-Album-Trackname.mp3". It skips files without track numbers so it won't affect your playlist files.
If required, I can add function to recurse through all subfolders, just contact me for more info. Likewise if you need this file in Excel 2003 format.
http://baldmosher.com/wordpress/wp-content/uploads/2012/10/Renamer.zip
Website structure was lost a while back, file now moved here:
http://www.baldmosher.com/files/GROM%20Renamer.zip
If required, I can add function to recurse through all subfolders, just contact me for more info. Likewise if you need this file in Excel 2003 format.
Website structure was lost a while back, file now moved here:
http://www.baldmosher.com/files/GROM%20Renamer.zip
Wednesday, 8 February 2012
Volvo S40/V40 Guide: Removal of indicator/wiper stalks
Tools required: Philips screwdriver (PH2)
Cowling = Steering column housing, plastic trim, one large piece below the column, one smaller piece atop.
Four broad, short black screws with black washers (i.e. standard trim screws) affix the trim piece above the footwell (i.e. the piece with the footwell light) - unscrew all four then this trim slides right and towards you and comes away easily
Two short black screws with black washers affix the bottom piece of cowling to the steering column, just underneath the steering wheel, facing you. Unscrew these.
One very long black screw (upper right of the 3 holes under the central cowling) simply fixes the upper+lower cowling pieces together, unscrew this, the top piece should then prise off with minimal force (note the couple of plastic tabs to clip the cowling pieces together again)
Release the steering column lever and pull the wheel down, the bottom piece then pulls away easily to reveal the innards of the column and both indicator stalks
Two small black philips screws hold each stalk into position, unscrew both and pull the stalk away then unclip the cabling plug.


You can then dismantle the stalk itself with another two small black philips screws, and give it a clean inside if it's full'o'muck.

I suspect that one of the two switches (right hand side) is either gunged up or faulty, but I'll clean off the gunge first.


Muck I wiped off (mostly grease to be honest) shown in photo below, but this didn't fix my problem. I suspect one of the two switches is faulty. Need to test the wiring and contacts with a voltmeter next.

Whole process takes about 2-3 minutes.
Putting it all back together again is a bit more of a fiddle, but pay attention to the two cowling pieces which should clip together neatly, and the rubber seals around the stalks sit flush outside the cowling, so getting both in snugly is a bit of a faff, but reassembly took me 5 minutes in total. Screwing the bottom piece back to the column before clipping the two pieces together worked best for me, but ymmv.
NB: I think the shiny screws are holding the ignition barrel in place - it seems I'd have to remove the steering wheel to get access to them anyway.
Cowling = Steering column housing, plastic trim, one large piece below the column, one smaller piece atop.
Four broad, short black screws with black washers (i.e. standard trim screws) affix the trim piece above the footwell (i.e. the piece with the footwell light) - unscrew all four then this trim slides right and towards you and comes away easily
Two short black screws with black washers affix the bottom piece of cowling to the steering column, just underneath the steering wheel, facing you. Unscrew these.
One very long black screw (upper right of the 3 holes under the central cowling) simply fixes the upper+lower cowling pieces together, unscrew this, the top piece should then prise off with minimal force (note the couple of plastic tabs to clip the cowling pieces together again)
Release the steering column lever and pull the wheel down, the bottom piece then pulls away easily to reveal the innards of the column and both indicator stalks
Two small black philips screws hold each stalk into position, unscrew both and pull the stalk away then unclip the cabling plug.


You can then dismantle the stalk itself with another two small black philips screws, and give it a clean inside if it's full'o'muck.

I suspect that one of the two switches (right hand side) is either gunged up or faulty, but I'll clean off the gunge first.


Muck I wiped off (mostly grease to be honest) shown in photo below, but this didn't fix my problem. I suspect one of the two switches is faulty. Need to test the wiring and contacts with a voltmeter next.

Whole process takes about 2-3 minutes.
Putting it all back together again is a bit more of a fiddle, but pay attention to the two cowling pieces which should clip together neatly, and the rubber seals around the stalks sit flush outside the cowling, so getting both in snugly is a bit of a faff, but reassembly took me 5 minutes in total. Screwing the bottom piece back to the column before clipping the two pieces together worked best for me, but ymmv.
NB: I think the shiny screws are holding the ignition barrel in place - it seems I'd have to remove the steering wheel to get access to them anyway.
Wednesday, 28 December 2011
Problems with taking ownership / access rights in Windows 7
If you ever suffered the major and incredibly frustrating problems with Windows 7 when moving an NTFS hard disk to a new PC, or reinstalling the OS: the inability to open, delete, take ownership, or amend permissions on files or folders, then look no further than this thread on Microsoft social support forums
Note my post towards the end of that thread, made today, which amends the excellent original instructions provided by ColtWanger (lol) as follows:
I have thousands of files across hundreds of folders that Win7 simply won't allow me to access since I moved the drive from another machine. I have SP1 installed and although I haven't wasted any more time messing with permissions and audit rights I'm still getting the same issues with being denied access when I try to open the files. So I followed Coltwanger's advice above and amended slightly for my needs:
click Start and type CMD
right-click Command Prompt to run as Administrator
in the cmd window, use cd to find the relevant folder or drive root. In my case this required two commands, D: then cd\
First run TAKEOWN to take ownership.
TAKEOWN /F *.* /A /R /D Y
/F *.* processes all files/folders
/R recurs for all subfolders and files
/A takes permission for the Administrators group (I could easily have specified my own username, or omitted this switch, it shouldn't be necessary as I'm running CMD as Administrator anyway but I was wary that the next step might have failed)
/D Y suppresses the confirmation prompts
Then run ICACLS -- I amended with /grant:R to replace all existing permissions. This fixes a bug where unrecognised owners can remain in place. You can manually add extra user permissions via Windows once this is done.
ICACLS D:\* /grant:R baldmosher:F /T
Successfully processed 31380 files, 0 failures. YAAAAAY!!!!
Update 2012-02-08:
I made copies of all the above folders onto a different hard drive, once I got admin access to them, just to make sure that the permissions from my new HomeGroup setup are the default on all the folders. Much easier than trying to second guess Windows and set them yourself using command line options.
Update 2012-08-05:
Today I realised my wife couldn't access the shares from her laptop. I thought about adding her to every shared folder, but I figured it was easier to do it properly, and give access to the HomeGroup.
I also realised she didn't have a user ID on this machine, so I had to do that first (making sure the username and password matched the one on her laptop), then the following at command line run as Administrator:
ICACLS D:\* /grant:R HomeUsers:F /T
Note my post towards the end of that thread, made today, which amends the excellent original instructions provided by ColtWanger (lol) as follows:
I have thousands of files across hundreds of folders that Win7 simply won't allow me to access since I moved the drive from another machine. I have SP1 installed and although I haven't wasted any more time messing with permissions and audit rights I'm still getting the same issues with being denied access when I try to open the files. So I followed Coltwanger's advice above and amended slightly for my needs:
click Start and type CMD
right-click Command Prompt to run as Administrator
in the cmd window, use cd to find the relevant folder or drive root. In my case this required two commands, D: then cd\
First run TAKEOWN to take ownership.
TAKEOWN /F *.* /A /R /D Y
/F *.* processes all files/folders
/R recurs for all subfolders and files
/A takes permission for the Administrators group (I could easily have specified my own username, or omitted this switch, it shouldn't be necessary as I'm running CMD as Administrator anyway but I was wary that the next step might have failed)
/D Y suppresses the confirmation prompts
Then run ICACLS -- I amended with /grant:R to replace all existing permissions. This fixes a bug where unrecognised owners can remain in place. You can manually add extra user permissions via Windows once this is done.
ICACLS D:\* /grant:R baldmosher:F /T
Successfully processed 31380 files, 0 failures. YAAAAAY!!!!
Update 2012-02-08:
I made copies of all the above folders onto a different hard drive, once I got admin access to them, just to make sure that the permissions from my new HomeGroup setup are the default on all the folders. Much easier than trying to second guess Windows and set them yourself using command line options.
Update 2012-08-05:
Today I realised my wife couldn't access the shares from her laptop. I thought about adding her to every shared folder, but I figured it was easier to do it properly, and give access to the HomeGroup.
I also realised she didn't have a user ID on this machine, so I had to do that first (making sure the username and password matched the one on her laptop), then the following at command line run as Administrator:
ICACLS D:\* /grant:R HomeUsers:F /T
Friday, 18 November 2011

Tuesday, 11 October 2011
Volvo S40/V40 Guide: Replace battery in remote key fob (phase 2)
This simple guide is for Volvo S40/V40 (Phase 2, 2000-2004) remote fob, as shown in pictures. I guess the same process will apply to other similar shaped Volvo fobs, including the one with the boot release, but it might differ for early (Phase 1/1.5) S40/V40 fobs.
You will need:
- two strong hands (or one weak hand plus a lever, e.g. flat blade screwdriver)
- replacement CR2025 3v Li-ion 'button' battery
- optional: 5-level mortice key
1. remove the corner ring (it'll snap the plastic corner off if you don't)
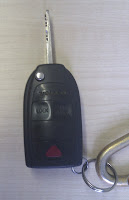
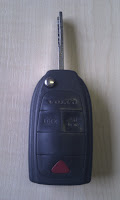
2. the lower section of the back panel lifts off in the direction shown (you could use a flat blade screwdriver, or twist a 50p, but I just used my index finger and a bit of elbow grease) - WARNING: do this above a desk, as the battery will probably fall out and you will want to put it back in the fob as quickly as possible, not much good if it slips down the edge of the driver's seat.
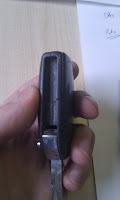
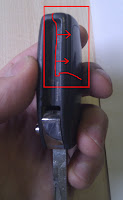
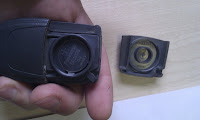
3. I imagine at this point you would be replacing with a brand new battery. Single Duracell CR2025 batteries with good lifespan are about £1 each delivered on eBay, but you can get 10 'unknown' brand for that price, and over 10 years will you notice much difference? Probably not. The original battery in mine (Panasonic) is nearly 10 years old and still working fine but I've replaced it as a matter of course. Li-ion batteries usually have 10 year "best before" shelf life, but they will clearly last much longer than that. 10 years would be my absolute maximum recommended for these fobs, unless you have a spare battery or fob in your pocket all the time.
Tip: Use a permanent marker to write the expiry date on the new battery's top surface, so you know when to next replace it!
4. Cover is replaced just as easily, just line up the ring corner edge first, and give it a good firm shove back into place using your thumbs.
5. Replacing the small ring is a lot more fiddly, I used a 5-lever mortice key to prise & hold the ring apart whilst I shoved it back onto the fob.
You will need:
- two strong hands (or one weak hand plus a lever, e.g. flat blade screwdriver)
- replacement CR2025 3v Li-ion 'button' battery
- optional: 5-level mortice key
1. remove the corner ring (it'll snap the plastic corner off if you don't)


2. the lower section of the back panel lifts off in the direction shown (you could use a flat blade screwdriver, or twist a 50p, but I just used my index finger and a bit of elbow grease) - WARNING: do this above a desk, as the battery will probably fall out and you will want to put it back in the fob as quickly as possible, not much good if it slips down the edge of the driver's seat.


3. I imagine at this point you would be replacing with a brand new battery. Single Duracell CR2025 batteries with good lifespan are about £1 each delivered on eBay, but you can get 10 'unknown' brand for that price, and over 10 years will you notice much difference? Probably not. The original battery in mine (Panasonic) is nearly 10 years old and still working fine but I've replaced it as a matter of course. Li-ion batteries usually have 10 year "best before" shelf life, but they will clearly last much longer than that. 10 years would be my absolute maximum recommended for these fobs, unless you have a spare battery or fob in your pocket all the time.
Tip: Use a permanent marker to write the expiry date on the new battery's top surface, so you know when to next replace it!
4. Cover is replaced just as easily, just line up the ring corner edge first, and give it a good firm shove back into place using your thumbs.
5. Replacing the small ring is a lot more fiddly, I used a 5-lever mortice key to prise & hold the ring apart whilst I shoved it back onto the fob.
Thursday, 4 August 2011
Saturday, 9 April 2011
Guide/How To: Changing Cabin Air Filter on 2002 Volvo S40/V40 (ph2)
I thought I'd make a guide for changing the cabin air filter, since I've just done it in my V40, it didn't hurt to take some photos as I went along.
It's a laughably easy job to change the filter, which can be bought for about £15-20, and saves a little bit of labour cost at service. Took me about 5 minutes to change. As a non-mechanically minded type, I'm always slightly fearful of doing anything to my car without seeing a series of pictures and words first, so here you go. Mine is a UK right hand drive V40 phase 2 (02 plate).
Lo and behold, I've solved my windscreen demist problem! Now lots and lots of air blows up the windscreen, which wasn't happening before, to the extent that I figured the routing flap or linkage must be broken. It clearly isn't, so that was a cheap relief. Judging by the state of the one I took out, I now understand why there wasn't any throughput..... no idea how long it's been there but I suspect it's probably the original filter.
I suspect my passenger foot well cowl has been replaced by the previous owner, it's a different colour (black instead of beige), there are two extra screw holes as if it's come from another car, and I don't know why it's so tatty. But anyway.
EDIT (18/11/2011): the effiency of mine has decreased over the past year. As such it does appear to need changing once a year. I'm yet to remove it to have a look at the condition but there's a lot less air throughput than there was immediately after fitting.
You're looking for two black screws along the top edge to unscrew to release the cowl. There could be a third screw or clip to release (see later) as my cowl seems to be a bit too loose, but this should be easy to find.
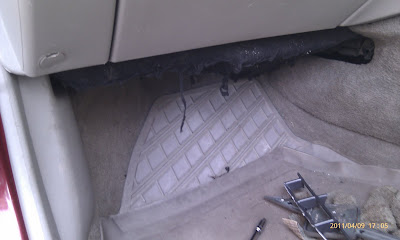
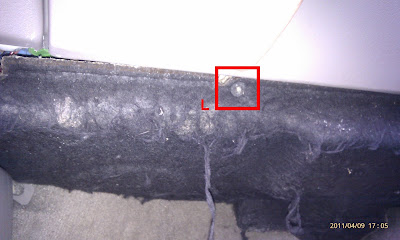
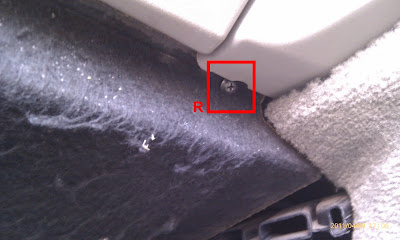
Once you've undone the two screws, simply tug the cowl in the direction of the arrow.
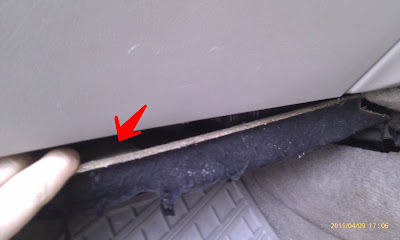
It'll come away really easily.
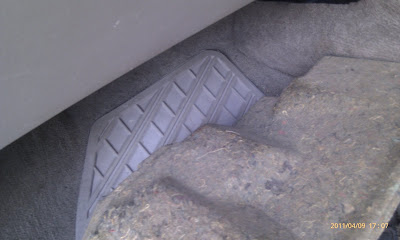
Probably best to put the screws back in the cowl so you don't lose them....!
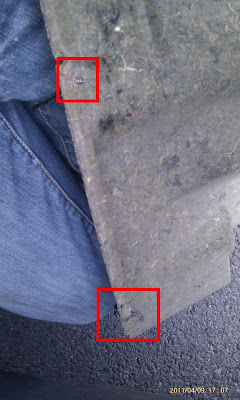
Dead centre, just below the bottom edge of the glove box, you'll see this label, and a black plastic tab, which is the near end of the cover for the air filter.
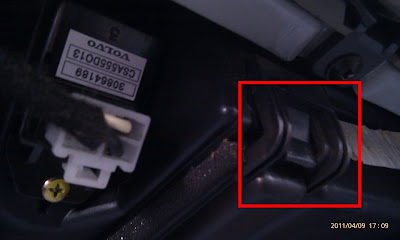
Simply push the tab, and pull the front of the cover piece down and then away. The cover rests on a ledge at the back to ensure a good fit.
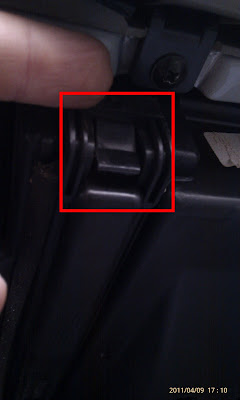
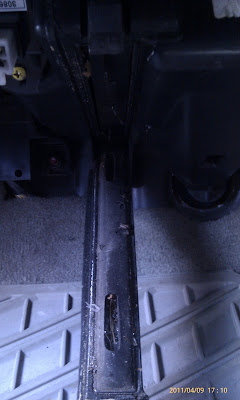
The cover is foam-backed with a couple of apertures. Give it a quick brush out if it's as filthy as mine!
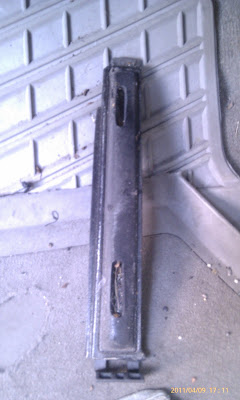
This is the bottom end of the filter. Note the arrow pointing at the burr, this helped me to work out which way around to put the new filter in.
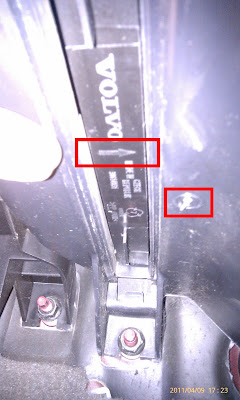
Simply tug down the black tabs to pull out the old filter.
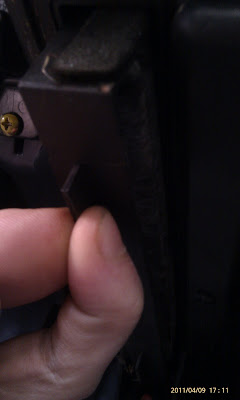
Note that there are a series of plastic teeth down the left side of the filter. This means the filter will bend safely to the left, which you need to do to remove it, but it will NOT bend the other way!
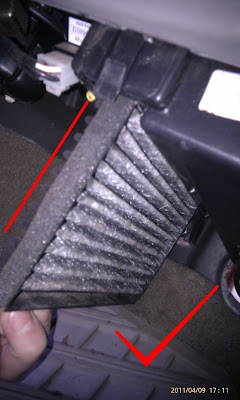
And this is my old filter removed, first photo is the left (input) side. As you can see it's clogged with black dust, leaf debris and grime from goodness knows how many years of being in there...
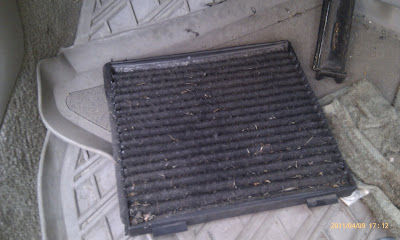
...but it's done pretty well at its job, as this photo is the right (output) side which is surprisingly clean considering the other side.
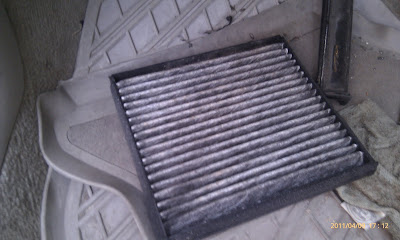
(edited 18/11/2011)
So this is the replacement part, 30612666 which is for V40/S40 phase 2 with air conditioning. This superseded the phase 1 filter part number. There's apparently a different part for non-AC models. This one cost me about £15 delivered from eBay but they don't come up all the time and price from FRF Swansea using Volvo Owners Club internet discount code C3 is £15 + £3 delivery. Make sure yours is a new, boxed Volvo part, if possible, although you can buy aftermarket filters for about £15. I got a sticker with mine so I could record the date and mileage.
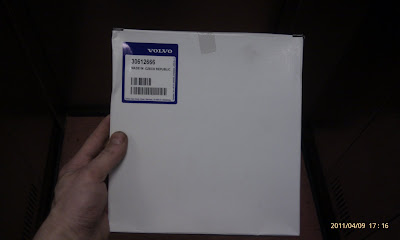
Simply shove the new filter back up into the slot, the Volvo logo should be facing you with the teeth up the left side. Make sure you only bend the filter to the left as shown.
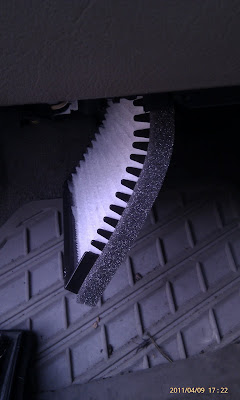
This is what happens if you put it in or bend it the wrong way. So don't...
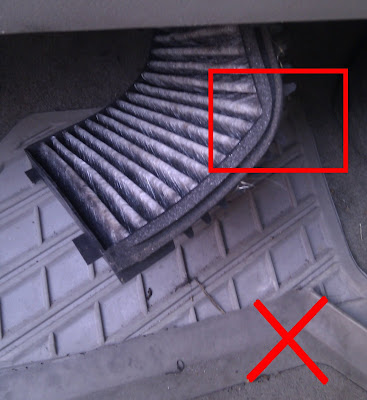
With the new filter fully inserted, simply replace the cover by resting the far end on the ledge, and lifting the near end until the plastic tab clicks into place.
Shove the cowl back into place, making sure you fit the right side above the air vents. Screw the two screws into the metal threads, as shown below.
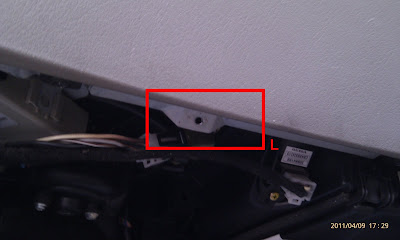
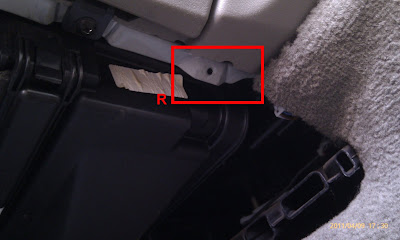
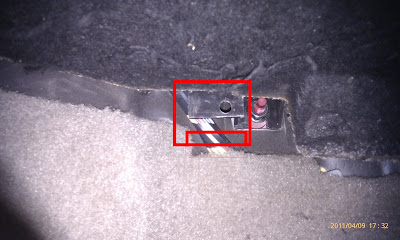
What I don't know is whether there's another fitting missing. The cowl is very loose, and there's a suspicious looking place where a retaining clip might go, but as you can see, that would leave a suspicious gap around the cowl.
It's a laughably easy job to change the filter, which can be bought for about £15-20, and saves a little bit of labour cost at service. Took me about 5 minutes to change. As a non-mechanically minded type, I'm always slightly fearful of doing anything to my car without seeing a series of pictures and words first, so here you go. Mine is a UK right hand drive V40 phase 2 (02 plate).
Lo and behold, I've solved my windscreen demist problem! Now lots and lots of air blows up the windscreen, which wasn't happening before, to the extent that I figured the routing flap or linkage must be broken. It clearly isn't, so that was a cheap relief. Judging by the state of the one I took out, I now understand why there wasn't any throughput..... no idea how long it's been there but I suspect it's probably the original filter.
I suspect my passenger foot well cowl has been replaced by the previous owner, it's a different colour (black instead of beige), there are two extra screw holes as if it's come from another car, and I don't know why it's so tatty. But anyway.
EDIT (18/11/2011): the effiency of mine has decreased over the past year. As such it does appear to need changing once a year. I'm yet to remove it to have a look at the condition but there's a lot less air throughput than there was immediately after fitting.
You're looking for two black screws along the top edge to unscrew to release the cowl. There could be a third screw or clip to release (see later) as my cowl seems to be a bit too loose, but this should be easy to find.


Once you've undone the two screws, simply tug the cowl in the direction of the arrow.

It'll come away really easily.

Probably best to put the screws back in the cowl so you don't lose them....!

Dead centre, just below the bottom edge of the glove box, you'll see this label, and a black plastic tab, which is the near end of the cover for the air filter.

Simply push the tab, and pull the front of the cover piece down and then away. The cover rests on a ledge at the back to ensure a good fit.


The cover is foam-backed with a couple of apertures. Give it a quick brush out if it's as filthy as mine!

This is the bottom end of the filter. Note the arrow pointing at the burr, this helped me to work out which way around to put the new filter in.

Simply tug down the black tabs to pull out the old filter.

Note that there are a series of plastic teeth down the left side of the filter. This means the filter will bend safely to the left, which you need to do to remove it, but it will NOT bend the other way!

And this is my old filter removed, first photo is the left (input) side. As you can see it's clogged with black dust, leaf debris and grime from goodness knows how many years of being in there...

...but it's done pretty well at its job, as this photo is the right (output) side which is surprisingly clean considering the other side.

(edited 18/11/2011)
So this is the replacement part, 30612666 which is for V40/S40 phase 2 with air conditioning. This superseded the phase 1 filter part number. There's apparently a different part for non-AC models. This one cost me about £15 delivered from eBay but they don't come up all the time and price from FRF Swansea using Volvo Owners Club internet discount code C3 is £15 + £3 delivery. Make sure yours is a new, boxed Volvo part, if possible, although you can buy aftermarket filters for about £15. I got a sticker with mine so I could record the date and mileage.

Simply shove the new filter back up into the slot, the Volvo logo should be facing you with the teeth up the left side. Make sure you only bend the filter to the left as shown.

This is what happens if you put it in or bend it the wrong way. So don't...

With the new filter fully inserted, simply replace the cover by resting the far end on the ledge, and lifting the near end until the plastic tab clicks into place.
Shove the cowl back into place, making sure you fit the right side above the air vents. Screw the two screws into the metal threads, as shown below.


What I don't know is whether there's another fitting missing. The cowl is very loose, and there's a suspicious looking place where a retaining clip might go, but as you can see, that would leave a suspicious gap around the cowl.

Wednesday, 15 December 2010
Monday, 1 November 2010
Tuesday, 24 August 2010
Monday, 16 August 2010


Monday, 12 July 2010

Sunday, 11 July 2010
Wednesday, 2 June 2010

Sunday, 23 May 2010

Subscribe to:
Posts (Atom)